How to set up cover files using Nonstop Templates
This guide is for use during Phase 2 of your file process with us. It's long but if you just go through it step by step, it'll take you about 10 minutes to complete this portion and you'll have the most design and quality control this way.

Your PDF should look like this when you send it to us.
If you followed the tutorial below then your final file should have the same ability and items that you see below. We can do this step for you but if you want more control over your art and a quicker turnaround, this is the way to do it.
Before you begin you need this.
You will have sent us a file with the whole book that we used to generate a proof, report, and cover templates. The spine of your cover is completely dependent on an accurate interior page count and accurate paper selection thickness.
How-to Video Guide
10 minute video that quickly goes through the information below.
https://www.loom.com/share/fbf5bd9b6a98419baa6c8683dcf61aeb
Tutorial
Step 1 - Template File Location
- We'll likely send a link with several folders and tools. For the cover template, open the _cover template folder. Example below:
- Start with the Outside cover template. Open it in Adobe Acrobat. Pro is best but you can get reader for free.
- Look at the information at the bottom of the template, we'll use that to create the document in inDesign.
zoomed into the circled area, it looks like this. Now you have what you need to set up your inDesign document and can move onto the next step.
Step 2 - Setting up a new InDesign document with the Cover Template
- In Adobe inDesign, open a new document and input the information from the template into the appropriate fields. We'll use the example above and input the numbers like shown below.
- Click create, and your document should look appropriate to the book cover you're making. It mimics the template we created and it will make positioning your elements much more simple. Our example is below:
- You can place the template from us by going to the menu bar and navigate to "File" > "Place" (keyboard shortcut command or control + D). Click on the "Outside Cover Template". Our example below.
- Click open. In the options area, select "crop to: Media" and check "transparent background"
- Click anywhere on the screen to drop the template. Don't worry about placement, we'll show you a trick in a sec.
- click once on the object you just placed. then click on the little icon like shown before and select "align to spread"
- Then in that same little area, click on the two icons we circled. This will center the object you just placed in inDesign.
- It should look like the below if done correctly.
Step 4 - Inserting "score" in the outside cover
This is nearly identical to step 3 except you will only select the "score" lines. This is so that our machines know exactly where to put the fold lines for the spine.
- Now, open the "Layers" palette by going to the top menu bar and navigating to "Window" > "Layers". Double click on the "Layer 1" text and rename it to "Template".
- Lock the "Template" layer you just created by pressing on the empty space to the right of the eyeball. That way, you won't have to worry about selecting any object in that layer. To modify objects later, just click on the eyeball again.
- Now, add a new layer by pressing the tiny + icon on the bottom right and name it "Score". Click on that layer and it should look like this
- With the "score" layer selected, go to the menu bar and navigate to "File" > "Place" (keyboard shortcut command or control + D). Click on the "Outside Cover Template". Make sure "Show Import Options" is selected. Go to the Layers section. Unview the "Template" and "Notes", and view the "Score Lines". If you did it properly, you will see the two little lines on to and bottom to indicate the folds. Screenshots below.
Finally, lock the score layer so you don't move that element by accident.
Note: Objects in inDesign originally appear blurry. This is because inDesign is trying to conserve computer processing power so it doesn't slow down your workflow. If you want to make things clear, on the top menu bar navigate to "View" > "Display Performance" > "High Quality Display". Everything will be sharper now, but slower. Change it back to "Typical Display" to improve work speed. Example before and after below:
Step 5 - Place Outside Cover Artwork
- Go to the layers pallet, add a new layer called "Art". Make sure other layers are locked.
The "Art" Layer should be on the bottom so that the "score" and template can still be seen even if you have large images. - Add in art or place other photos, pdfs, objects the same way you placed the template. Make sure you put elements that going to the very edge of the cover all the way to the red line or else you'll see thin white lines on your book cover which will look terrible. You can see a better explanation here. example below of another document.
Step 6 - Place inside cover templates and artwork
Steps 2-5 go through this well. The only difference is that you need to add "white space" to allow for glue tolerance on the inside and the magenta line just shows you where the hinge starts. Take a look at any physical perfect bind book and you will see that the glue actually goes about .25" outside the spine. We call that the hinge. Screenshots below to show quick visual steps.
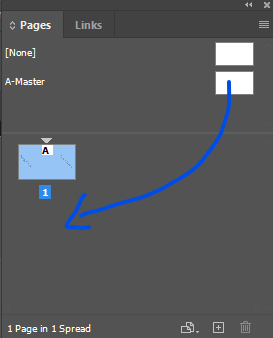
- Create a new page by going to the "Pages" pallet and dragging the master page below page 1.
- Unlock the template layer, select the template layer, and place the inside template and center it.
- lock the template layer, unlock the score layer, select the score layer, place the inside cover template, go to the layer section, unview the template and notes eyeballs, view the "score lines" and "white box for glue allowance" items and press ok.
If you do this correctly, it looks like the last screenshot.
Finally, lock the score layer.
Note: you'll see a white box right next to the "score" lines. This is for glue allowance to stick the book block to the cover.- Place artwork. In our example, we put a red flood background as an example. Notice that there's a white box on top. Thats great! Remember that we need that white space to allow for glue to adhere the interior book block to the cover.
Notice that for the inside cover, the artwork goes a bit beyond the magenta line. This is so that no thin white lines shows up where the cover hinge meets the interior book block.
Before you export, check this.
Great work getting this far! Before you export, you want to make sure your layers are working as expected so just
Exporting your cover file to PDF with special settings
Use the "Nonstop Spread Export" to export the right file.